

What You’ll Learn 🧩
Understand DewesoftX’s export architecture and the role of custom C++ plugins
Set up the development environment: Dewesoft SDK, sample export plugin project, compiler toolchain
Implement key plugin callbacks: initialization, data flushing, stream management, and shutdown
Access live and archived data buffers, channel metadata, and timestamps
Export data to custom formats—binary, CSV, XML, proprietary—tailored to application needs
Add plugin configuration options (parameters, file paths, channel filters) via DewesoftX UI
Handle multi-threaded and buffered data flows safely for high-throughput applications
Package, register, and deploy plugins across DewesoftX systems for end-user use
Course overview
The Developing Custom Export Plugins for DewesoftX Using C++ course equips software engineers with the knowledge to extend DewesoftX’s export capabilities. Beginning with an introduction to the existing export framework, you’ll explore when to use a custom plugin versus built-in CSV, binary, or UFF/UNV exporters.
You’ll then set up your development environment, including the SDK, sample plugin code, and compiler toolchain. Through guided modules, you’ll implement critical export interface callbacks—handling initialization, streaming data blocks in real time, managing buffer flushing and completion, and plugin teardown—while efficiently reading channel data and metadata.
Focusing on real-world needs, the training includes exercises to export to custom formats (e.g. proprietary binary, structured text, or XML) and incorporate user-facing options such as output paths, channel selection filters, and sampling rates.
Advanced topics cover ensuring safe and performant multi-threaded and buffered data handling, as well as packaging plugins (DLL and manifest files), registering them in DewesoftX, and distributing them to other users.
By the course’s end, you’ll be ready to create robust C++ export plugins that seamlessly integrate with DewesoftX—from development through deployment—enabling tailored data export workflows for demanding test and measurement environments.
Introduction to C++ export plugin
Imagine a scenario where Dewesoft data can be analyzed and post-processed using any software you prefer. While Dewesoft already supports a wide range of export formats, it doesn’t cover all possible options. With the help of the C++ Export Plugin, you can extend Dewesoft to support virtually any format you can think of.
The output of a C++ Export Plugin is compiled into an external library with a .exp extension and is automatically detected and loaded by Dewesoft at startup.
An example of a C++ Export Plugin, which will be used throughout this tutorial, can be installed using the VSIX installer and will be explained in detail in the following sections.
How to install the Dewesoft plugin template?
To start using the C++ Plugin, you must have Visual Studio 2017 or Visual Studio 2019 installed on your system. We chose Visual Studio for several reasons: its robust functionality, powerful developer tools such as IntelliSense code completion and debugging, a fast and responsive code editor, and its ease of customization and modification, among many other benefits.
The Dewesoft plugin for Visual Studio development can be found on the Dewesoft website under Visual Studio 2017/2019 Development Tool. Note that you must be logged in to access the C++ Plugin section. Once downloaded, simply double-click the VSIX file, and the installer will guide you through the installation process.


To create a new C++ Export Plugin project, use the Search box in the upper-right corner of the Online tab to locate the template.
You can access the new project window by navigating to:
File → New → Project.


Custom export call diagram
Before we jump into the programming part, we first need to explain how exporting in Dewesoft works. There are two types of exports: channel-based and value-based.
Channel-based export - writes all data (and times) from one channel. Once all the samples are written, we start writing another channel.

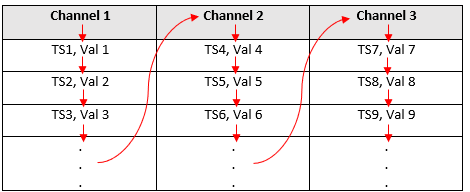
Value-based export - writes the N-th sample for each channel where N represents the time from start to finish. When all N-th samples are written, N is increased by the time step of the channel with the highest synchronous rate.

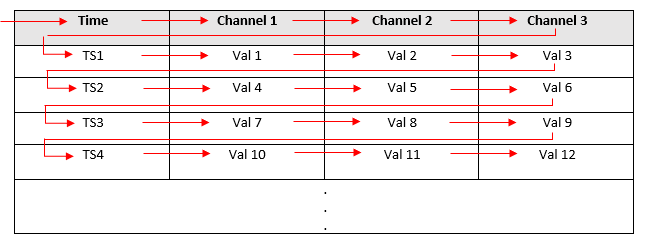
The export type can be defined inside the get_ExportType() function.
The main difference between these two export types lies in the sequence of function calls made from the start to the end of the export process. The order of these function calls, along with a brief explanation of each, is shown in the tables below.


Example - exporting data as text to be imported into Dewesoft
As already mentioned, this example can be generated using the MUI Plugin Wizard. If you're not familiar with the basic settings the MUI Plugin Wizard provides, you can read more about them in the Basic Custom Plugin Development in C++ section under Example: New C++ Plugin.
To create the same example used in this tutorial, select "Dewesoft Test Export Example" from the combo box, as shown in the image.

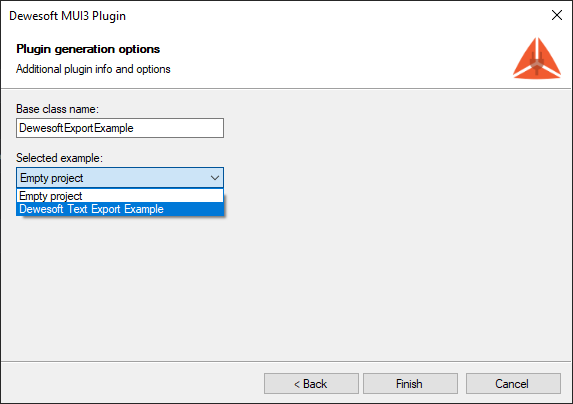
This example demonstrates a complete process for creating a text file that can later be imported into Dewesoft. It also serves as a solid foundation for building your own custom export. Once the project is created, you should see the following project structure:

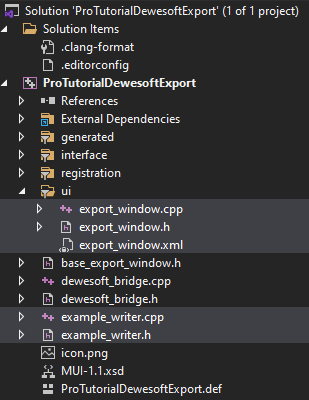
Most of the development work is done in the selected files.
ui folder - user interface and its actions are defined there
example_writer files - endpoint where all export functionality should be added
If you encounter the following error after creating the plugin:
Error MSB8036: The Windows SDK version sdk_version was not found.
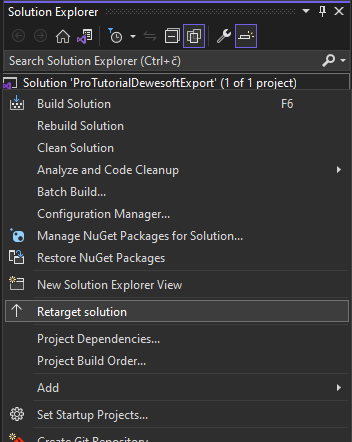
You should retarget your solution to use the version of the SDK that is installed on your system. To do this, right-click the solution node in Solution Explorer and select Retarget Solution.

Once the Retarget Solution window opens, select the "Latest installed version" option.
User interface and settings storing
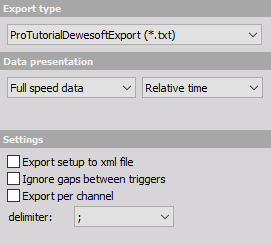
To simplify the export process as much as possible, the user is allowed to change only one export setting — the delimiter character. For this reason, the MUI library has been integrated into custom exports. In general, this library enables you to create a custom user interface for interacting with users. If you're not yet familiar with the MUI library workflow, you can read about it in Basic Custom Plugin Development in C++. In our case, the user can choose between three delimiter characters: tab, comma, or semicolon.
Each time Dewesoft is closed, the export plugin settings are reset. To avoid this, we can store these settings and reload them the next time Dewesoft is launched. Functions for reading and writing settings are already provided in the example.
1void ExampleWriter::write_ini_file(
2{
3    tortellini::ini ini
4    ini["UI"]["DELIMITER"] = data_delimiter; // here we store the delimiter setting
5
6    update_location_of_dll();
7    std::ofstream out((location_of_dll_folder + "example_export.ini").c_str());
8    out << ini;
9}
In our case, we only need to store one setting. To save (write) the setting, the following line of code is used — the first bracket (e.g., UI) represents the group, and the second bracket (e.g., Delimiter) represents the unique ID for the setting within that group. The user can change the data_delimiter value by selecting a different item in the ComboBox.
o read the setting value, we use the corresponding function, which requires the same group and unique ID for each value. If the value is not stored at the time of reading (e.g., during the first launch of the application), we specify a default value. In our case, the default delimiter will be the comma (",") character.
1void ExampleWriter::read_ini_file()
2{
3    tortellini::ini ini;
4    update_location_of_dll();
5    std::ifstream in((location_of_dll_folder + "example_export.ini").c_str());
6
7    in >> ini;
8    data_delimiter = ini["UI"]["DELIMITER"] | ","; // here we are reading the stored delimiter setting
9}
Export output
Before we continue, we need to understand the structure of the exported target format. In our simple case, the format requires value-based data as well as single-value channels. Therefore, we will set the export type to etValueBased inside the get_ExportType function.
1void ExampleWriter::get_ExportType(ExportTypes* Value)
2{
3    *Value = etValueBased;
4}
In this example, the custom export generates a single file that contains both a header and data section. The file name is obtained in the put_filename function, and the file stream is created in the StartExport function. The data will be written afterward. To generate the header section of the file, we simply output all the available metadata about the data file, separating each line with a newline character.
1void ExampleWriter::WriteInfoString(BSTR Description, BSTR Value)
2{
3    write_to_output_file(bstr_to_str(Description) + " - " + bstr_to_str(Value), true);
4}
This process is carried out using all the functions that provide export metadata.
An example of the header content can be seen in the image below.


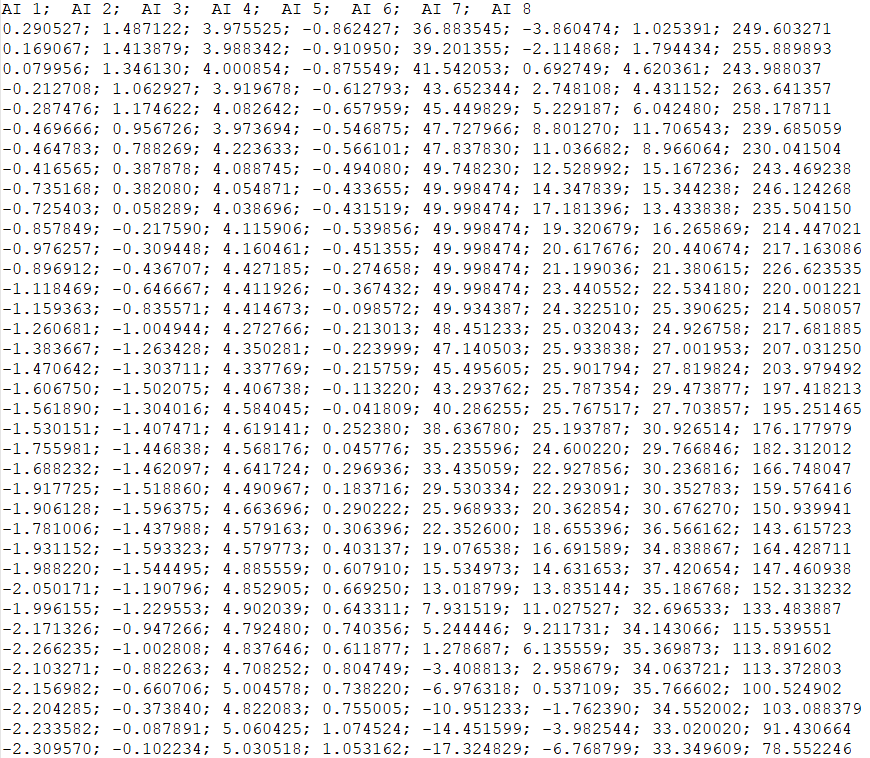
As for the data section of the file, the format requires the first row to contain channel names, while all subsequent rows contain the data values (each row includes N values, where N is the number of channels). To output the channel names, we use the SetChannel function. Here, we also verify that the export sample rate is the same for all channels — another requirement of this format. If the sample rates do not match, the export process is aborted, and no data is exported.
To write the actual data, we use the WriteValue function, whose implementation is shown in the code below. This function is called for each sample. Each value is written to the file, followed by a delimiter — or a newline character if the value was written to the last channel. The write_to_output_file function, implemented in the example, appends the string content to the output file.
1void ExampleWriter::WriteValue(float Value)
2{
3    write_to_output_file(std::to_string(Value));
4    sample_counter++;
5    if (sample_counter % number_of_channels == 0)
6    {
7        write_to_output_file("", true);
8        sample_counter = 0;
9    }
10    else
11        write_to_output_file(get_data_delimiter_char());
12}
When examining the data portion of the output file, you'll see that the data is structured and adheres to the Dewesoft format. In this case, the delimiter is a semicolon (";") because it was selected as the default option in the combo box.


For the purpose of this Pro tutorial, we did not need to modify any Dewesoft internals. However, if we wanted to support additional features — such as exporting different channel types or stopping the export under certain conditions — we would need to send notifications to Dewesoft. For example, to enable array channel export, we would return True in the evSupportsArray function, which is called inside the DewesoftBridge::OnEvent function. There are many other events that can be used for sending notifications or exchanging information with Dewesoft, but these are beyond the scope of this tutorial.
Testing the output
Of course, the whole point of exporting data is to be able to use it in another format — for example, to open it in different software. However, for the purpose of this Pro tutorial, we will demonstrate the full cycle by exporting the data from Dewesoft and then importing it back into Dewesoft. While this may not be a practical use case, it helps wrap up the entire process as a complete and clear example.
To test this, you will need the TxtImport plugin. Once downloaded and placed into the Addons folder, it should become available under Analyse > Import within Dewesoft.
After selecting the newly exported file, make sure to configure the appropriate settings in the panel on the left. The delimiter must match the one used during export — in our case, that was a semicolon (";").

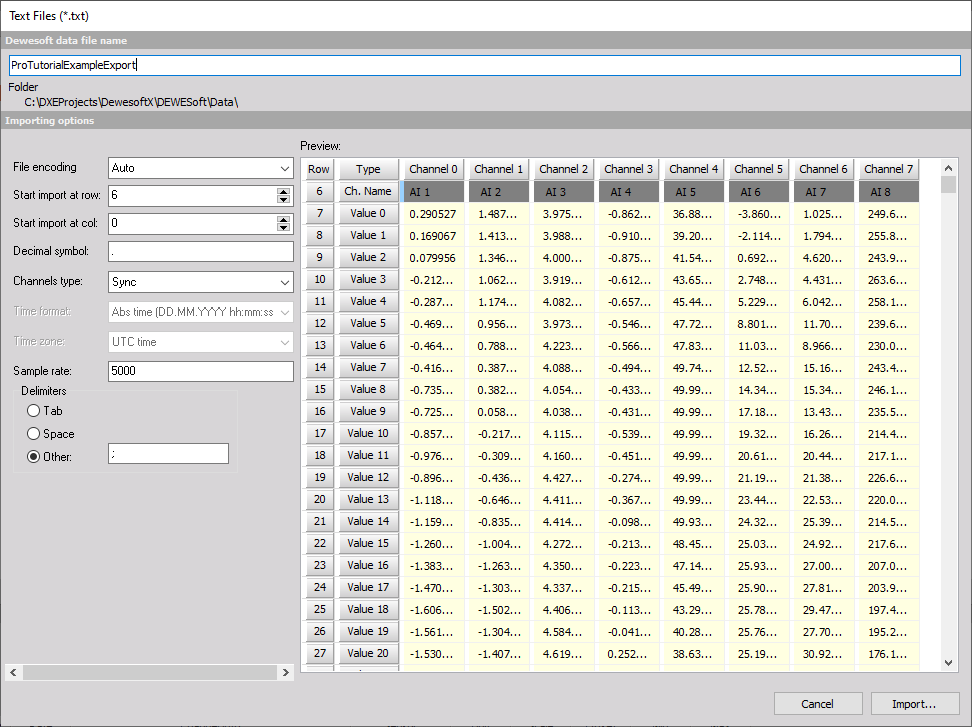
Once the settings are configured, click the Import button. The final result will be visible inside Dewesoft.


Page 1 of 8